 |
Publication Date: 16 February 1996
System Version: GCCS 2.1/Update 4
Web Page Created: 4 April 1996
Setup. None.
OBJECTIVE. Without the use of references, identify three possible breaches of WWMCCS or JOPES security.
G-LINK Security. Every workstation, which needs to access JOPES, must also have the G- LINK software and script files installed. While this software is not classified, it is required for JOPES operations.
WASSO. The WASSO assigns a Person ID (PER), a Project Code (PJ), and a Person Identification Code (PIC) to each user. The PER and PJ are not classified, but the PIC is classified Secret. All JOPES users must possess a Top Secret security clearance. The WASSO is the individual that enters each users PER, PJ, and PIC into the system. Without that sign-on information, access is prohibited.
Personal Security. In order to sign into the system, you must tell the system who you are (identification) and provide the proper password for access (authentication).
Project Code. The Project Code is associated with permissions. Access to files, applications, and data is controlled by the Project Code assigned to your Person ID.
Personal Identification Code. Your Personal Identification Code is often referred to as your Password. It is the one that is classified Secret and only you know what it is. It is the key that unlocks the door of WWMCCS and lets you in.
Database Access Control. The JOPES database is split into two parts. There is a "Real World" and an "Exercise" portion. Access to either one or both can be granted, again by the use of Project Codes.
Physical Security. The physical security of a site must meet minimum requirements established for the highest classification of all categories of data that are contained on the system. Establishment of an adequate physical security environment at each installation is an important part of achieving a secure data processing environment. This is achieved by the following:
Positive physical access controls are established to prevent unauthorized entry into the computer facility and other critical areas that support or affect the operation of computer equipment or processing of data by this equipment.
Physical access to data files and media libraries is restricted to individuals who require access for the performance of their official duties.
In addition to the physical protection of the machines, data files, and media libraries, you must also consider physical proximity to other systems. Non fiber-optic communication lines and computer terminals are separated from telephones, telephone lines, and other computers by two inches to 10 feet, depending on the setup and whether the lines are filtered or shielded.
Product/Output Security. All users may classify data up to and including Top Secret. They will initially treat display screens, disks, files, and computer printouts as Top Secret. Each user is responsible for ensuring the proper marking and protection of all outputs.
The marking and downgrading procedures are done following the guidance in DoD 5200.1-R and as supplemented in local security guidelines.
File Management. Output data can also be stored in user created mainframe files or on hard drives or floppy disks at workstations. Both the FM and users must downgrade disks and files when necessary.
Now that you have had some of these gentle reminders concerning security, you should go ahead and sign on to the system.
OBJECTIVE. Given a WWMCCS environment, login to the mainframe and access JOPES.
| CONNECTING AND ACCESSING TS3 | ||
|---|---|---|
| Step | Activity | Anticipated Result |
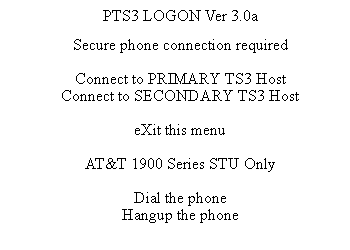
| 1 | At the DOS prompt, type "ts3log", press <RETURN>. | TS3 LOGON Menu (Fig. 8-1) displays. |
 |
Note: If you have an AT&T model 1910 with the remote control option turned on, then you can use option D to establish the connection. If your model 1910 remote control option is turned off or you do not have a 1910, then you must dial manually.
| CONNECTING AND ACCESSING TS3 | ||
|---|---|---|
| 2 | Type "d", press <RETURN>. | TS3 LOGON Menu (Fig. 8-1) redisplays. |
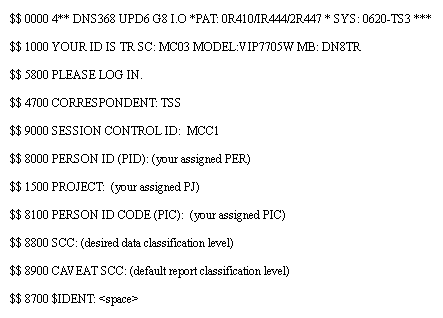
| 3 | Type "p", press <RETURN>. | Several informational messages (see note) will appear, followed by the default datanet Logon screen (Fig. 8-2). |
Note: If any step takes more than one minute, the LOGON script will terminate. The LOGON script is designed to automatically correct most connection problems. The LOGON script may have to run twice to actually correct a problem; therefore, always try at least twice to connect before assuming there is a problem requiring TS3 local node System Administrator assistance.
 |
| CONNECTING AND ACCESSING TS3 | ||
|---|---|---|
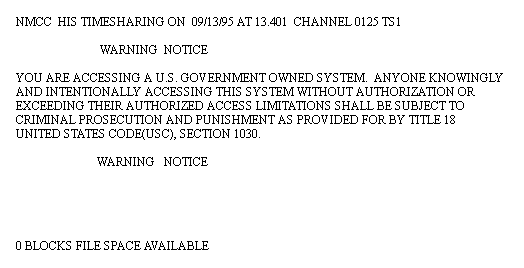
| 4 | At the CORRESPONDENT prompt, type "tss", press <RETURN>; at the SESSION CONTROL ID prompt, type "mcc1", press <RETURN>; at the PERSON ID (PID) prompt, type {your assigned PER}, press <RETURN>; at the PROJECT prompt, type {your assigned PJ}, press <RETURN>; at the PERSON ID CODE (PIC) prompt, type {your assigned PIC}; at the SCC prompt, type {your desired data classification level}; at the CAVEAT SCC prompt, type {your default report classification level}, press <RETURN>; at the $IDENT prompt, type <SPACE><RETURN>. | The timeshare prompt (*) (Fig. 8-3) displays. |
Note: The SESSION CONTROL ID prompt identifies either the primary (NMCC2) host or the backup (ANMC2) host site. The entry to connect to the primary host site is MCC1, while the entry to connect to the backup host site is ANM2.
 |
| CONNECTING AND ACCESSING JOPES | ||
|---|---|---|
| Step | Activity | Anticipated Result |
| 1 | At the TSS prompt, type "jopes", press <RETURN>. | CF-001, JOPES MASTER MENU (Fig. 8-4), displays with message "VERIFYING YOUR AUTHORIZATIONS--PLEASE BE PATIENT." |
 |
Time Out Feature. TS3 has a security feature resident on the system that causes a terminal to automatically disconnect from the mainframe if no communication between the mainframe and remote terminal occurs during a specified period of time (usually 10 minutes).
Resetting the Time Out Feature. Every time you press the <RETURN> key, the clock resets to the established time limit. Normally this does not pose a problem since you are continually communicating with the mainframe.
JOPES Data Entry Rules.
Line Entry. Line entry screens do not have brackets. You may see some examples in later lessons. A blinking cursor normally identifies the data entry location.
Cursor Movement.
<SHIFT><TAB> or MACRO KEY 50 moves the cursor back to the previous data field in forms mode.
Arrow keys, or a site-unique combination of <ALT> or <CTRL> and <ARROW> keys, move the cursor within a data field in both modes.
Entry of a character in the last position of a data field causes the cursor to advance to the next data field in forms mode.
Data Entry Characteristics. Now that you know how to get to a data field, you will look at some characteristics of data entry.
The cursor must be at the end of the line to send data to the mainframe in line entry mode.
In either mode, you may type over existing characters within a data field.
To delete an entire field in forms mode, type "C" in the Function Code field (if available on screen), type "#" in the first position of the field to be deleted, and <RETURN>.
Use "?" and/or "!" characters only in specific database fields where indicated. These characters may cause unpredictable results if entered in the wrong field.
If the terminal is in a hung mode (e.g., unable to use keys or mouse to move on the screen), check with the local TS3 administrator for procedures.
Some screens have a separate, non-modifiable section. This section appears on the screen where it does not interfere with normal cursor movement. A line or a section heading separate the section from the rest of the screen.
Required Entries.
File or Tape Required Entries. Usually, if the information you want to review, modify, or create resides on a tape or a file, enter only a subsystem code to navigate to subsystems 1 through 0.
Command Line. The last line of the JOPES form is for command instructions, system responses such as error messages, or command input (menu or display screens). The system dependent entries allow the user to access reference files, page through multiple page displays, change to a new function, and use the JOPES Information Trace (JSIT) or the JOPS III System Monitor Commands. JOPES processes the entries when the user presses <RETURN>.
Entering any invalid code causes the JOPES Master Menu to appear.
Entering an "X" in the Subsystem Code field also causes the JOPES Master Menu to appear.
The Function Code. The Function Code field allows a choice of screens to review or modify data or to specify retrieval criteria. The user may make the following entries in the Function Code field.
Entering "Z" causes the user to exit JOPES.
Entering a valid character calls up the screen for the selected function of the subsystem.
Some screens contain the following options. Each screen will indicate which of the options are available on any particular screen.
Entering "C" (change) modifies an existing record in response to new entries.
Entering "D" (delete) removes the entire existing record from the database.
Entering "R" (review) displays the first page of the existing record.
Entering "?" (HELP) on any F6 screen calls that HELP screen.
Entering any invalid symbol calls the subsystem menu.
Option (Menu) Selection. The second way to navigate is by option selection. Many JOPES screens list options from which the user may select one or more options for further processing. This provides a method of indicating selection while limiting parameters and navigating within the subsystem.
Paging Commands. This is the third way to navigate.
Some screens with more than one page or which display details on following screens have a Continue, Next, or page # field. Call the next page of the screen or the next screen in the series by typing "C," "N," or the page # in the designated field, and pressing <RETURN>.
Other screens use <SPACE> <RETURN> to get the next screen in the series. These screens usually have the instructions, <SPACE> <RETURN> to continue, at the bottom. As with all screens, when in doubt, READ THE DIRECTIONS on the SCREEN!
Command Language. This is often referred to as a shortcut to navigation.
Enter an asterisk (*) and the Subsystem/Function codes on the command line to navigate to another subsystem/function. For example, to access Function 1 of the Requirements Subsystem, enter "*B1" on the command line at the bottom of the display screen and <RETURN>. To exit JOPES, enter "*Z" and <RETURN>. To return to the JOPES Master Menu, enter "*X" and <RETURN>.
System Monitor Commands. System Monitor commands provide a quick method of accessing the JOPES reference files and JOPESREP tables, working with user-created files, and changing the default classification and identification lines on printed reports. The JOPES System Monitor Users Manual and Chart 2 list the available commands.
Navigation Demonstration. This demonstration will consist of a review of USERID Permissions (Subsystem G) and a display of the OPLAN List Screen.
 REVIEW USERID PERMISSIONS |
||
|---|---|---|
| Step | Activity | Anticipated Result |
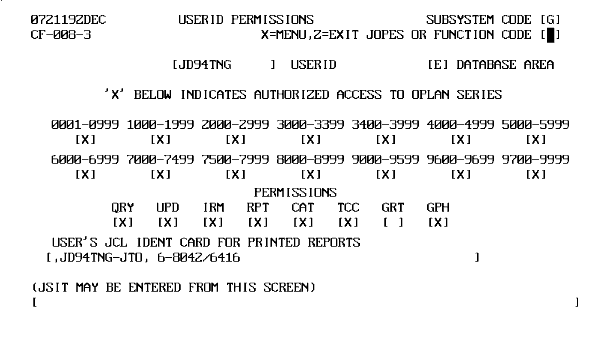
| 1 | Type "g" in SUBSYSTEM CODE, "e" in DATABASE, and press <RETURN>. | CF-008, USERID PERMISSIONS (Fig. 8-5), displays. |
 |
Plan Access and Permissions directly relate to the PJ and the selected database (E or R).
An X indicates access to OPLAN series.
Functional permissions apply to all OPLANs in the designated series in that database, including close hold and limited access plans, which require specific access.
Functional Permission Categories. The JOPES control structure includes eight functional permission categories. An X indicates access to one or more permissions. These permissions apply only to the on-line database.
UPD (Update). The user may add, change, or delete information to/from the database.
IRM (Information Resource Manager). The user may load and update OPLAN data, review user permissions, recover the database, and monitor system performance.
RPT (Reports). The user may print reports using high-speed system printers.
CAT (Crisis Action Team). The user may initiate, delete, batch update OPLANs, and do other necessary scheduling actions.
TCC (Transportation Component Command). The user may establish and change carrier identification and itinerary information and divert TCC carriers.
Note: TCC permissions should not be required in the TS3 system. They are used to control carrier information which should not be entered. Execution of Top Secret plans should occur after the plan is downgraded to a minimum of Secret and transferred to GCCS JOPES for execution.
GPH (Graphics). The user may select database subsets and establish a graphics file for portraying data with user specified parameters.
User's JCL Ident. The User's JCL Ident for batch jobs allows proper distribution of any report by the host where the report processes.
TS3 System Level Permissions. The TDBM ensures that all PER/PJ have TS3 system level permissions. These TS3 permissions allow users access to the files and software that comprise JOPES including TUCHA, TUDET, GEOFILE, APORTS, CHSTR, PORTS, and ASSETS (Table 8-1).
 READ PERMISSIONS |
|
|---|---|
| General | Specific |
| CMDLIB JDS LIBRARY IDSQDIR4DATAQRY TUCHA TUDET GEOFILE |
APORTS CHSTR PORTS ASSETS |
Tape Permissions. Users who will require access to 9-track tapes for saving and backing up their data will also need to have specific tapes assigned to their PJ. The FM will again be able to assist.
Permission Points of Contact.
Note: Review the permissions and controlling office list below (Table 8-2). It lists the permission and the appropriate person/office responsible for assisting/granting it.
 PERMISSIONS AND CONTROLLING OFFICE |
|
|---|---|
| Permission | Person/Office |
| PERSON ID, Project Code, and PIC | WASSO |
| TS3 Systems Permissions (JOPS files, JDS Software) | FM/TDBM |
| Functional Permissions for Real World and Exercise Databases | FM |
| OPLAN Series Permissions | FM |
| Close Hold Plan Authorization | FM |
| File Space | FM |
| Tapes | FM |
Note: If you need additional JOPES help, contact USTRANSCOM J3-JTO at DSN 576-8042 or commercial (618) 256-8042.
| REVIEW OPLAN LIST | ||
|---|---|---|
| Step | Activity | Anticipated Result |
| 1 | Type "x" in SUBSYSTEM and press <RETURN>. | CF-001, JOPES MASTER MENU (Fig. 8-4), redisplays. |
| 2 | Type "list" in OPLAN and press <RETURN>. | CF-010, JOPES OPLAN MENU (Fig. 8-6), displays. |
|
|
OPLAN List Screen Data Fields.
OPLAN Type. Type refers to one of three OPLAN access types. Each plan type provides a different measure of access control.
Limited Access Plans. Access to these plans is limited by PJ and/or terminal ID and can be networked to the backup site. A word of caution. If that particular terminal goes down for any reason, access will be denied to authorized project codes when they try to use a different terminal if that terminal ID was not also specified at creation. Limiting OPLAN access prevents any nonregistered users from even seeing the OPLAN on their database OPLAN list. For users granted access, their functional permissions, previously granted by the FM, will apply.
Close Hold Plans. Access to Close Hold plans is limited by PJ and/or terminal ID. Each plan is site-unique and cannot be networked to the backup site until it has been changed to a limited access or normal plan. This OPLAN type provides further access limitations and security. To initiate a close hold OPLAN, the FM must register the user as an authorized close hold plan creator. This permission remains in effect until withdrawn. The creator must contact those individuals/agencies requiring access to the close hold OPLAN and enter the appropriate PJs and/or terminal IDs into the system. JOPES Users Manual, Volume 5 (classified), contains step-by-step procedures.
Note: Close hold and limited access OPLANs will display only if the OPLAN creator has granted permissions based on Project Code or terminal.
Security Classification. Unclassified, Confidential, Secret, Top Secret.
Note: Most plans should be either Top Secret, close hold, or SPECAT because those are the plans being developed on the TS3 system.
Note: None should be declared because execution is supposed to occur in GCCS JOPES after downgrade to a minimum of Secret.
Delete. OPLAN is being deleted.
Load. OPLAN is being loaded.
Build. OPLAN is being updated.
Locked. Specific transportation related data fields are protected from change if an entry is in the Schedule Status Flag (SSF) field.
Note: No records should have an entry in the SSF field because execution occurs in GCCS JOPES.
Note: The following steps assume that you have been in both the JDS and JOPS applications. If you have not been in both applications, then some steps are not required or will not be displayed.
| DEMONSTRATE LOGOUT PROCEDURES | ||
|---|---|---|
| Step | Activity | Anticipated Result |
| 1 | On the FRG Menu, enter "x" in EXIT or "*finish" on the Command Line and press <RETURN>. | CF-001, JOPES MASTER MENU (Fig. 8-4), redisplays. |
| DEMONSTRATE LOGOUT PROCEDURES | ||
|---|---|---|
| 2 | Type "z" in FUNCTION CODE or "*z" on the Command Line. Press <RETURN>. | MONITOR RUN LOG screen displays. |
| DEMONSTRATE LOGOUT PROCEDURES | ||
|---|---|---|
| 3 | Type "end" and press <RETURN>. | JOPES TERMINATED screen displays. |
Logout of TSS.
| DEMONSTRATE LOGOUT PROCEDURES | ||
|---|---|---|
| 4 | At the * prompt, type "bye" and press <RETURN>. | "Session 1 terminated by the remote TCP host, Reset received" message displays. |
Exit the Workstation.
| DEMONSTRATE LOGOUT PROCEDURES | ||
|---|---|---|
| 5 | Press <ALT-9>. | G-LINK Screen displays. |
| 6 | Press <ALT-Q>. | "Are you Sure" message displays. |
| 7 | Type "y". | DOS prompt displays. |
Note: <ALT-9> only works with the STU AT&T model 1910 with Remote Control enabled. This executes the HANGUP.SCR G-LINK script. If using a different type of STU or Remote Control is not enabled, then hangup the STU to break the secure connection.
Summary. During this lesson, you were exposed to the various security systems associated with the mainframe environment and acquainted yourself with the sign on procedures and some navigation techniques required by the system. TS3 requires the use of Person IDs, Project Codes, and Personal Identification Codes for system entry.