 |
Publication Date: 17 February 1996
System Version: GCCS 2.1/Update 4
Web Page Created: 20 March 1996
Setup. To accomplish this lesson, you need GCCS connectivity and access to the JOPES database and applications (Session Manager and System Services). USERID requires NFM functional permissions. The USERID (user account) must be a member of the UNIX group, JADMIN with execute permissions for the TP/TDS Management subsystems and with execute permissions for Local OPLAN Database Cleanup (DBA function).
The lesson also includes the Network Functional Manager's (or DBA's) ability to add/delete/modify database servers from the network.
By now, many of you are probably thinking that much of what you are about to cover is somebody else's job. It would be nice to know, but that is about it. It is always good to know how someone else's actions will affect what you do. That knowledge allows you to better plan your actions.
OBJECTIVE. Without references, explain the JOPES database save/archive process.
Potential Site Failures. In addition to human errors, the potential for a hardware, software, and facility failure is probably higher than you would think. Failure can occur if the site is invaded by some foreign entity, like water in the computer room from cooling pipes, broken air conditioners that allow the build up of excessive heat, dust that may cause a disk failure, power interruptions, or lightning/static electricity that might cause disk damage. Any of these events could cause a database site to fail.
The logical answer to recovery after a database failure is to reload from backup data.
Determine Backup Media. Once that is established, the next thing is to decide what media will be used to store the information. The selection of the media will depend on the size of the database, the volume of records to be saved, the frequency of saves, the purposes, and the type of transactions to be saved (TPFDD/OPLAN).
Determine Backup Schedule. Once those questions are answered, a schedule can be established to accomplish the saves as required.
Determine Networked Database Source. Each database site should identify another site with similar requirements for networked plans.
If a local site's JOPES database needs to be replaced, a "current" copy of the networked information can be obtained from a selected site that is not currently experiencing any problems.
Determine Locally Distributed Database Information Source. Locally distributed JOPES database information is a slightly different story. The major difference is that the locally distributed JOPES information is exactly that. It is locally resident only and is not anywhere else.
There are two options available for you to create backup copies of the locally distributed JOPES database. You are already knowledgeable concerning both of them because you used them in Lesson 4.
The second option is the Offload Plan option. It allows you to save OPLAN data to a disk file or to a tape. You may save every plan that is locally distributed at one time by entering each PID to the Offload Plans list.
Note: You will receive screen advisories if the save must be split between several tapes.
OBJECTIVE. Without references, explain the process used to recover the JOPES database at a failed site.
Remove Local OPLANs from Database. The FM and DBA at the providing site coordinate to ensure that any local OPLANs are removed from the data being sent to the receiving site.
Transfer the Tailored Database. The providing site then copies its networked database to a tape or file and the networked data is transferred to the receiving site.
Upon arrival at the receiving site, the networked OPLAN data is loaded to the Oracle database.
During the recovery operation, each site must also consider the impact of stopping the flow of update transactions into their database.
Controlling the flow of transactions through the TP, the Receive Queue, the TDS, and the Send Queue will be discussed later in this lesson.
Cleanup Recovered Database. The Local OPLAN Recovery Cleanup option on the Plan Maintenance tear-off is used to ensure that the sending site's locally distributed OPLANs were indeed "cleaned out."
Only USERIDs designated as members of the UNIX permissions group assigned to the Oracle Database Administrators will be able to execute this option.
Note: The user account group name for the Database Administrators is site specific.
| LOCAL OPLAN DATABASE CLEANUP | ||
|---|---|---|
| Step | Activity | Anticipated Result |
| 1 | On the Plan Management tear-off, <POINT AND CLICK (left)> on Local Oplan Recovery Cleanup. | The LOCAL PLAN DATABASE RECOVERY CLEAN UP window (Fig. 6-1) displays. |
 |
All data for all networked plans not distributed to the receiving site's server are deleted. Recognition of PID initialization is maintained.
All networked plans routed to the receiving site's server, but not containing any data, are displayed in a pop-up window for review and further action. The missing data will require upload from previously accomplished saves or the partial site recovery procedures can be used.
Add Local Data. The upload of locally distributed OPLANs will probably be accomplished by using the Reload Plan option.
It is quite possible that the individuals personally responsible for each of those OPLANs may have more current data available.
That is, very briefly, the method by which a complete JOPES OPLAN database can be restored. But what can be done if a site restores from a backup site and is not perfect. Some data is still not correct and this major overhaul needs a minor tuneup as well. You can now go back to the previous menu and the lesson will describe the partial site recovery procedures.
| LOCAL OPLAN DATABASE CLEANUP | ||
|---|---|---|
| 2 | Press <F10> or <POINT AND CLICK (left)> on F10-Back to go back to the previous menu. | Previous menu displays. |
The condition that you have now (non-synchronous OPLANs) is identical to the one taught in Lesson 4, so the procedures to follow and the windows to use are the same.
Now that you are familiar with the site JOPES database recovery capabilities of the new software, you will proceed to the functions used to control the activities of the Transaction Processor and the Transaction Distribution Services.
OBJECTIVE. Given access to a GCCS environment, access the JOPES Transaction Processor and JOPES Transaction Distribution Services windows and explain their function.
| TRANSACTION PROCESSOR MANAGEMENT | ||
|---|---|---|
| Step | Activity | Anticipated Result |
| 1 | On the GCCS SYSTEM SERVICES tear-off, <POINT AND CLICK (left)> on System Services Utilities. | The System Services Utilities cascade displays. |
| 2 | <POINT AND CLICK (left)> on the dotted line in the System Services Utilities cascade window header. | Cascade changes to a tear-off menu. |
| 3 | <POINT, DRAG, AND RELEASE (left)> the header line of the System Services Utilities tear-off to an open area of the screen. | The System Services utilities tear-off is repositioned on the screen. |
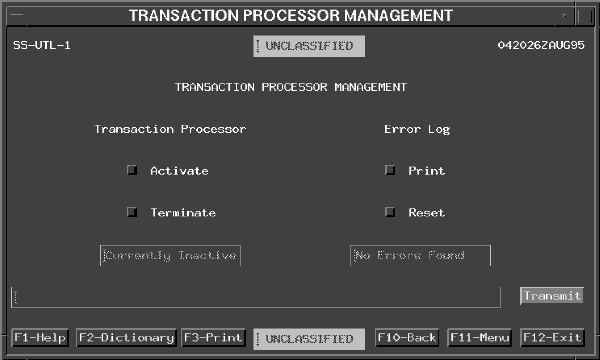
| 4 | <POINT AND CLICK (left)> on Transaction Processing Management. | The TRANSACTION PROCESSOR MANAGEMENT window (Fig. 6-2) displays. |
 |
To terminate (deactivate) the TP, select the Terminate button and then <POINT AND CLICK (left)> on Transmit. A "Termination Queued" message will display. A delayed response to the termination request can be expected if there are any transactions in the TP's internal buffer. All transactions in the TP's internal buffer must be processed before it will check for a termination request. When the TP has been terminated (is inactive), it does not communicate with the Receive Queue. Therefore, transactions in the Receive Queue will not be processed for update to the locally resident JOPES database.
Note: The full title for the Error Log referred to on the window is General Error Log. The General Error Log should not be confused with the Error Log. The Error Log stores transaction based errors and is accessible through the Audit Subsystem.
The General Error Log contents are printed on the default printer as configured by the System Administrator. To erase (empty) the file, depress the Reset button and then <POINT AND CLICK (left)> on Transmit.
Now that you know how to turn the TP on or turn it off, you will turn your attention to the TDS.
| TRANSACTION DISTRIBUTION MANAGEMENT | ||
|---|---|---|
| Step | Activity | Anticipated Result |
| 1 | Press <F10> or <POINT AND CLICK (left)> on F10- Back to go back to the previous menu. | Previous menu displays. |
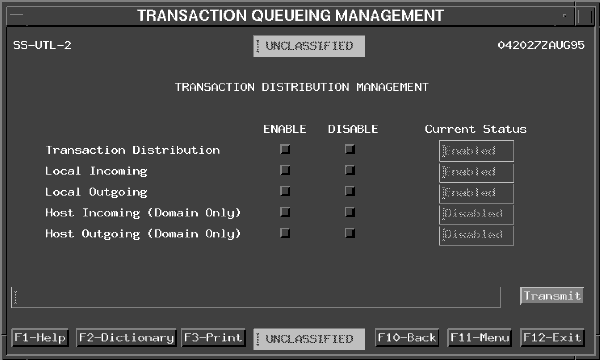
| 2 | On the System Services Utilities tear-off, <POINT AND CLICK (left)> on Transaction Distribution Management. | The TRANSACTION DISTRIBUTION MANAGEMENT window (Fig. 6-3) displays. |
 |
The TDS routes transactions from server to server, from mainframe to server, and from server to mainframe. Configuration of the TDS is also controllable by the System Administrator from the system level prompt (UNIX commands).
The Transaction Distribution Management window displays and controls the activity of the TDS and its components. The Current Status fields display the status of the TDS and its components.
To enable TDS, depress the Enable button; to disable TDS, depress the Disable button and then <POINT AND CLICK (left)> on Transmit. The system will update the Current Status field when the option is executed. If the selected option fails, the system will display an error message in the Message field.
Note: The Transaction Distribution Enable and Disable buttons are very similar to master switches.
When enabled, Local Incoming Transactions are inserted into the Receive Queue for database update. When disabled, Local Incoming Transactions are accumulated, but are not placed in the Receive Queue. Transaction flow throughout the rest of the network is not affected.
Local Outgoing Transactions. Local outgoing transactions are those transactions in the Send Queue that require distribution to the other TDS systems, which are directly connected to this TDS for update to their database server. Updates to databases do not flow via the mainframe network.
When enabled, Local Outgoing Transactions are taken from the Send Queue and distributed to the appropriate TDSs. When disabled, Local Outgoing Transactions remain in the Send Queue.
Host Incoming (Domain Only) Transactions. Host incoming (Domain Only) transactions are those transactions that must be submitted from this TDS to its directly connected mainframe host.
When enabled, the TDS submits transactions to its associated mainframe. When disabled, the TDS does not submit any transactions to its associated mainframe.
Host Outgoing (Domain Only) Transactions. Host outgoing (Domain Only) transactions are those transactions that must be pulled from the directly connected mainframe to this TDS for update to its associated database and forwarding via the Local Outgoing Send Queue as required.
When enabled, the TDS pulls transactions from its associated mainframe. When disabled, the TDS does not pull any transactions from its associated mainframe.
| TRANSACTION DISTRIBUTION MANAGEMENT | ||
|---|---|---|
| 3 | Press <F10> or <POINT AND CLICK (left)> on F10-Back to go back to the previous menu. | Previous menu displays. |
OBJECTIVE. Given a GCCS environment, explain the purpose of the JOPES TDS Network Management window.
Access. Access to the capability is via the System Services application.
| TDS NETWORK MANAGEMENT | ||
|---|---|---|
| Step | Activity | Anticipated Result |
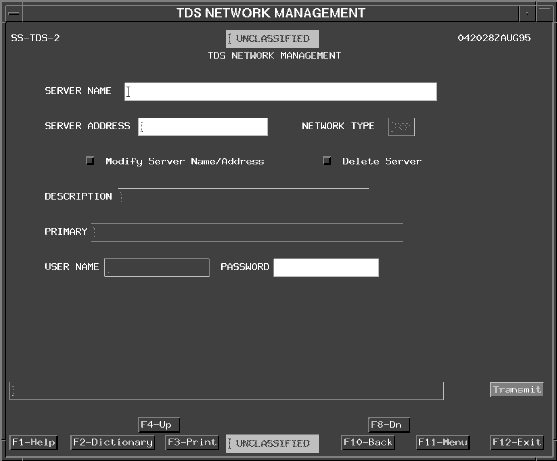
| 1 | On the System Services Utilities tear-off, <POINT AND CLICK (left)> on TDS Network Management. | The TDS NETWORK MANAGEMENT window (Fig. 6-4) displays. |
 |
The Server Address is the IP address for that server.
Note: The Network Type field will display the type of network to which this computer is connected.
The Primary field displays the name of the mainframe from which this server receives transactions and to which this server sends transactions. If this field is blank, then this server is not directly connected to a mainframe.
The User Name field is this server's account to which other computers forward transactions for JOPES database updates.
When another computer attempts to forward a JOPES OPLAN transaction, it must also know the password in order to access the user name account.
Modify. To modify an existing database server's information (not to include the name or address), the operator would first view the information and then tab to the appropriate field and make the modification. Clicking on Transmit will change the appropriate information.
If the database server name or server address requires modification, the operator should select the Modify Server Name/Address toggle. This causes all fields except the Server Name and Address to become inactive. The modification is affected by changing the name and/or address and clicking on Transmit.
Delete. To delete an existing database server from the TDS network, the operator would first view the information. By selecting the Delete Server button and clicking on Transmit, the server is deleted from TDS access.
Note: This database server is only deleted from the TDS network in the sense that other database servers no longer recognize this one as existing for the purposes of distributing JOPES OPLAN transactions. Physically, it is still connected to the communications network.
That completes your activities regarding the recovery of a database and the System Services mechanisms in place to control the activities of the Transaction Processor and the Transaction Distribution Services. You can now quit System Services.
| EXIT SYSTEM SERVICES | ||
|---|---|---|
| Step | Activity | Anticipated Result |
| 1 | To exit SS, Press <F12> or <POINT AND CLICK (left)> on F12-Exit on any SS window. | Confirmation Pop-up displays. |
| 2 | <POINT AND CLICK (left)> on Yes. | All System Services windows close. |