 |
Publication Date:
System Version: GCCS 2.1/Update 5
Web Page Created:
Setup. To accomplish this lesson, you will need GCCS connectivity and access to the JOPES database and JOPES applications (Session Manager and System Services through the JNAV window, and the IMS Admin Tool and RFM Admin Tool Icons). Your USERID must have either Site Functional Manager (SFM) or Network Functional Manager (NFM) permissions.
Almost everything you do in a classified system requires some type of permission to access the information. Some permissions you never even know about because they are an integral part of the environment, like file read and write permissions. Other permissions, like login passwords, require detailed administrative procedures to ensure system integrity. The first part of this lesson demonstrates how GCCS permissions are granted and administered.
OBJECTIVE. From a list of possibilities, predict the possible outcomes if certain specific system level permissions have not been granted.
Create NIS+ Account. The account that the ISSO creates is called the NIS+ account. NIS+ is the acronym for Network Information Service Plus. The creation of this USERID account allows the USERID to login to the servers and workstations that have been specifically identified as being a part of this network. The ISSO also can make this USERID a member of certain groups.
Note: Recall that "groups" is one of the means that UNIX uses to control access and permissions to files.
JADMIN Group. There are specific portions of the JOPES System Services application that are controlled by being members of the JADMIN group. These portions of System Services deal with what has traditionally been FM, SA, and DBA activities.
Assign Applications to the Launch Window. The SA accomplishes this task by assigning the appropriate ICONs (which represent individual applications) to the Launch Window for this specific USERID. Each USERID is limited to the applications (ICONs) available in their Launch Window.
Ensure Proper USERID to .rhosts File Relationship. In the client/server environment, portions of applications and databases can be spread over different machines. The SA should (must) also verify that the .rhosts file associated with this USERID identifies, as a minimum, all the machines necessary to run the applications in this USERID's Launch Window.
Assign USERID to the Appropriate JOPES Applications. Currently, each JOPES application, such as RDA, S&M, TCCESI, etc., requires that a script be run to enable each USERID to actually launch the applications in the Launch Window. These scripts are executed by the SA from system level.
DBA Actions. The DBA performs the third of the four activities. This activity provides the USERID access to the JOPES Oracle database and the ability to read and write to that database.
Assign Oracle Database Permissions. The creation of the Oracle account assigns read and write permissions to all of the appropriate tables in the JOPES database. Oracle checks the USERID (table- by-table) of everyone using the JOPES applications to ensure they have these permissions. This Oracle account is in addition to specific functional permissions associated with each USERID.
FM Actions. The FM performs the fourth of the four activities. This activity provides the USERID access to specific OPLANs in the JOPES Oracle database and the ability to extract and/or add and/or modify data to that database.
Assign JOPES Functional Permissions. The FM gives the USERID access to a series or several series of OPLANs. After having granted access to OPLANs, the FM also assigns functional capabilities, such as Query, Update, Create, etc. This limits that USERID only to the functional capabilities assigned.
IMS Admin Tool. The Information Management System is a tool that provides access to the TPFDD portion of the JOPES Oracle database for those JOPES applications that do not enjoy direct access. The FM controls the functionality assigned to IMS. This functionality is not unique to each user, but is the same for all users of IMS on that application server.
| PRACTICAL EXERCISE - PERMISSIONS SCENARIOS | |||
|---|---|---|---|
| Number | Scenario | Problem | Solution |
| 3.1 | An individual assigned to J3 has created a TPFDD in the JOPES Oracle database using the System Services application and has merged force records into it using the Requirements Development and Analysis application. She has also used the Ad Hoc Query application to run and print several reports. However, the External Systems Interface application refuses to start. Where is the trouble? | ||
| 3.2 | An individual in J2 has completed updating a TPFDD using RDA. With a little extra time on his hands, he has been wandering around in the System Services application just to see what is there. In his travels, he inadvertently turned off the JOPES Transaction Processor. Why was he able to do this? | ||
| 3.3 | An individual in J4 has been assigned the task of conducting a transportation feasibility assessment of a TPFDD using the JOPES application JFAST. However, JFAST does not access the JOPES Oracle database and he has no way to move the TPFDD to JFAST. What is the trouble? | ||
OBJECTIVE. From a list, match the JOPES functional permission definitions with their names.
Functional Permissions. Functional permissions control what you can do to the OPLANs to which you have access. For example, the JOPES database functional permissions assigned to your USERID control the menu options available on the System Services windows.
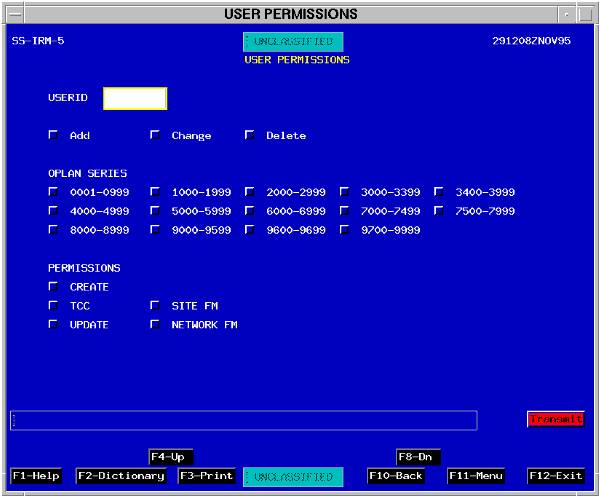
Note: The Query permission does not appear on any window. It is active as soon as the USERID is entered on the User Permissions window (Fig. 3-2) when the Add toggle is activated and the Transmit button is depressed.
Create (CRT). The Create permission is granted if you require the ability to initialize new OPLANs in the database.
Transportation Component Command (TCC). The Transportation Component Command permission is limited to those who require the ability to enter common user schedules into the S&M system. That includes USTC, MTMC, AMC, and MSC for the common user lift.
Site Functional Manager (SFM). The Site Functional Manager permission is given to those individuals who perform Site FM duties, such as granting access to OPLAN series and entering each user's individual permissions into the system.
Network Functional Manager (NFM). The Network Functional Manager permission is assigned to those individuals responsible for controlling the networking of plans around the GCCS network.
Note: There was an attempt to create a hierarchical structure with regard to permissions. SFM includes CRT, UPD, and QRY; and NFM includes SFM, CRT, UPD, and QRY. Currently (GCCS Version 2.1), the Validator permission has not been implemented, but should be in the next GCCS System Services release. It will replace some or all of the TCCESI system level permissions.
IMS. The IMS Admin Tool allows the FM to control the capabilities of IMS which is a tool used for the movement of TPFDD information out of the JOPES Oracle database and make it available for use by other applications. TPFDDs can be stored in IMS itself or in other files on the server accessible by different JOPES applications.
Now that you are very familiar with the permissions that are the responsibility of the FM, it is time to turn to the system and exercise some of your new found knowledge.
OBJECTIVE. Given a JOPES environment, administer JOPES functional Oracle database permissions for a new user.
Requirement. The reserve unit assigned to augment your headquarters has just reported for their two week active duty tour. Several of them will be working in the J3 and J5 offices and will require access to several of the JOPES applications. The ISSO, SA, and DBA have started their required actions. You, the FM, are responsible for assigning the functional permissions. They will require the following: Access to the entire 9000 series of OPLANs, the ability to add additional plans to the database, the ability to modify records within the 9000 series of OPLANs, and the ability to perform validator duties. They will not be required to add common-user carrier schedules to the database or perform any FM duties. IMS must be capable of extracting an OPLAN from the JOPES database and be made available for JFAST. JFAST will also need access to the TUCHA and GEO reference files.
| REVIEW/CREATE USERID ASSIGNED PERMISSIONS | ||
|---|---|---|
| Step | Activity | Anticipated Result |
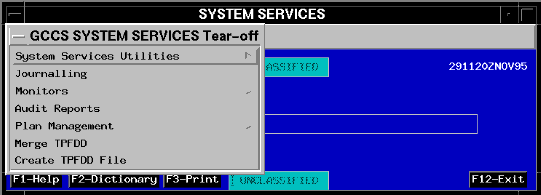
| 1 | From the SYSTEM SERVICES window, <POINT AND CLICK (left)> on the GCCS SYSTEM SERVICES title bar. | The GCCS SYSTEM SERVICES Cascade Menu (similar to Fig. 3-1) displays. |
 |
To "tear-off" a cascade, <POINT AND CLICK (left)> on the dotted line in the header to "pin" it to the desktop. You can "pin" more than one cascade and drag them to different locations on the desktop.
To close a tear-off menu, <POINT AND CLICK (left)> on the Window Menu button [-] in the upper left corner of the tear-off window's header line.
Because you will want to use the System Services cascade menu later, you will now use the tear-off function.
| REVIEW/CREATE USERID ASSIGNED PERMISSIONS | ||
|---|---|---|
| 2 | <POINT AND CLICK (left)> on the dotted line in the GCCS SYSTEM SERVICES cascade window header. | Cascade Menu changes to a tear-off menu (Fig. 3-1). |
| 3 | <POINT AND CLICK, DRAG, AND RELEASE (left)> the header line of the GCCS SYSTEM SERVICES tear-off to an open area of the screen. | The GCCS SYSTEM SERVICES tear-off is repositioned on the screen. |
| 4 | On the GCCS SYSTEM SERVICES tear-off, <POINT AND CLICK (left)> on the Plan Management option. | The Plan Management cascade displays. |
| 5 | <POINT AND CLICK (left)> on the dotted line in the Plan Management cascade window header. | The Plan Management cascade changes to a tear-off menu. |
| 6 | <POINT AND CLICK, DRAG, AND RELEASE (left)> the header line of the Plan Management tear-off to an open area of the screen. | The Plan Management tear-off is repositioned on the screen. |
| 7 | On the Plan Management tear-off, <POINT AND CLICK (left)> on User Permissions. | The USER PERMISSIONS window (Fig. 3-2) displays. |
 |
Requirement. Before starting to add the reservists' USERIDs, verify that your current USERID has either a Site FM or Network FM permission.
| REVIEW/CREATE USERID ASSIGNED PERMISSIONS | ||
|---|---|---|
| 8 | <POINT AND CLICK (left)> on the USERID
field.
Type your {userid} and press <TAB>. |
The USER PERMISSIONS window (Fig. 3-3) displays with applicable OPLAN series and permissions posted in the data fields. |
 |
Note: If your USERID does not have Site FM or Network FM permissions assigned, you would not have had to enter your USERID on this screen. The permissions assigned to your USERID would automatically display.
If you have either Site or Network FM permissions, you add, change, or delete permissions from this window.
| REVIEW/CREATE USERID ASSIGNED PERMISSIONS | ||
|---|---|---|
| 9 | Press <F1> or <POINT AND CLICK (left)>
on F1-Help for Help.
Read the Help window. |
Help window displays. |
<F3> on the keyboard or selecting F3-Print with the mouse executes a screen print that will print at the default printer (as established by the SA).
<F4> on the keyboard or selecting F4-Up with the mouse and <F8> on the keyboard or selecting F8-Dn with the mouse allows you to "page" through the list of USERIDs, forward (up) or backward (down).
<F10> on the keyboard or selecting F10-Back with the mouse returns to the previous menu. Selecting <F11> on the keyboard or selecting F11-Menu with the mouse returns you to the System Services window. Selecting <F12> on the keyboard or selecting F12-Exit with the mouse exits the application.
| REVIEW/CREATE USERID ASSIGNED PERMISSIONS | ||
|---|---|---|
| 10 | On the Screen Level Help screen, press <F10> or <POINT AND CLICK (left)> on F10-Back to exit Help and go back to the previous menu. | Previous menu displays. |
You will now add the reservists' USERIDs to the system.
| REVIEW/CREATE USERID ASSIGNED PERMISSIONS | ||
|---|---|---|
| 11 | <POINT AND DOUBLE CLICK (left)> on USERID field. | Field changes color for data entry. |
| 12 | Type "jd9resxx", where xx is a sequence number, and press <TAB>. | Advisory message displays stating that a new user is being added and the Add toggle depresses. The OPLAN Series and Permissions toggles remain toggled from the previously displayed USERID. If no USERID had been displayed, they would be blank. |
| 13 | <POINT AND CLICK (left)> on Add. | Add toggle turns red. |
| 14 | Ensure that only the 9000 OPLANs series are toggled. Additionally ensure that the CREATE and UPDATE functional permissions are toggled. If necessary, <POINT AND CLICK (left)> on the corresponding toggle to activate or deactivate the toggle. | Selections are toggled as required. |
| 15 | <POINT AND CLICK (left)> on Transmit. | An advisory message regarding the new user permissions displays. |
| 16 | Press <F10> or <POINT AND CLICK (left)> on F10-Back to go back to the previous menu. | Previous menu displays. |
| REVIEW/CREATE USERID ASSIGNED PERMISSIONS | ||
|---|---|---|
| 17 | On the Plan Management tear-off menu, <POINT AND CLICK (left)> on the User Permissions Report. | The USER PERMISSIONS REPORT window (Fig. 3-4) displays. |
 |
Review the report, then close the display and exit System Services.
| REVIEW/CREATE USERID ASSIGNED PERMISSIONS | ||
|---|---|---|
| 18 | Press <F12> or <POINT AND CLICK (left)> on F12-Exit. | Exit pop-up confirmation displays. |
| 19 | <POINT AND CLICK (left)> on YES. | The System Services application is closed and the Launch Window (Fig. 2-1) redisplays. |
OBJECTIVE. Given an operational GCCS environment, use the IMS Admin Tool to control the applications which can import/export TPFDDs through IMS.
| IMS ADMIN TOOL NAVIGATION | ||
|---|---|---|
| Step | Activity | Anticipated Result |
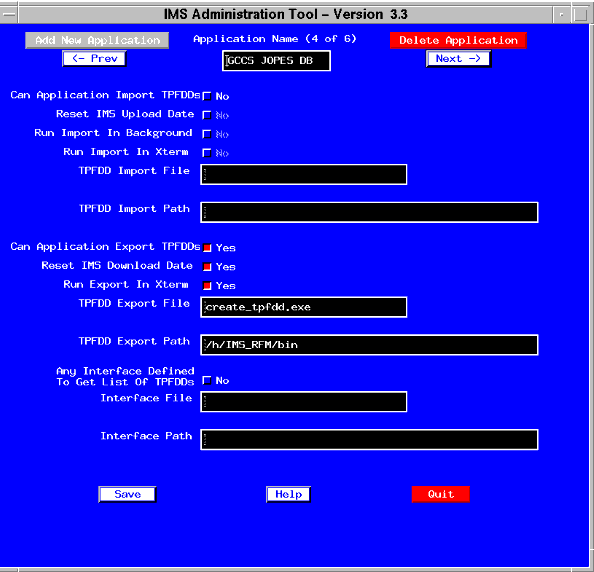
| 1 | From the Session Manager LAUNCH WINDOW, <POINT AND DOUBLE CLICK (left)> on the IMS_ADM icon. | The IMS Administration Tool window (Fig. 3-5) displays. |
 |
Enabling the View/Export Capability. The lesson will now demonstrate how to enable the capability to view and export TPFDDs from the JOPES database. This is an important feature if you want to control the distribution of the OPLAN to JOPES applications that do not directly access the JOPES database.
| IMS ADMIN TOOL NAVIGATION | ||
|---|---|---|
| 2 | From the IMS ADMINISTRATION TOOL window, <POINT AND CLICK (left)> on the Next button until GCCS JOPES DB appears in the Application Name panel. | GCCS JOPES DB appears in the Application Name panel. |
| 3 | Find the field titled "Can Application Export TPFDDs."
<POINT AND CLICK (left)> on the small button next to this field. |
The button turns red and the word Yes is displayed next to the field. |
Run Export in XTerm. If set to Yes, then an XTerm window will display the download process during a TPFDD export.
TPFDD Export File. This field contains the name of the executable file that performs the export of the TPFDD from the database.
TPFDD Export Path. This field contains the name of the path where the TPFDD file will be stored when IMS performs a TPFDD extract.
Save Button. You must save the changes you make for them to take effect. The changes you make will be reflected on the IMS window the next time it is activated from a Launch Window.
| IMS ADMIN TOOL NAVIGATION | ||
|---|---|---|
| 4 | <POINT AND CLICK (left)> on the Save button (located in the lower left). | Changes are saved. |
| 5 | From the IMS ADMINISTRATION TOOL window, <POINT AND CLICK (left)> on the Next button until JFAST appears in the Application Name panel. | JFAST appears in the Application Name panel. |
| 6 | Find the field titled "Can Application Import TPFDDs." | Ensure the button is red and the word Yes is displayed next to the field. |
| 7 | <POINT AND CLICK (left)> on the Quit button (located in the lower right). | IMS Administration Tool window closes. |
OBJECTIVE. Given a GCCS environment, use the RFM Admin Tool to identify an additional workstation/application requiring access to a specific reference file.
| RFM ADMIN TOOL NAVIGATION | ||
|---|---|---|
| Step | Activity | Anticipated Result |
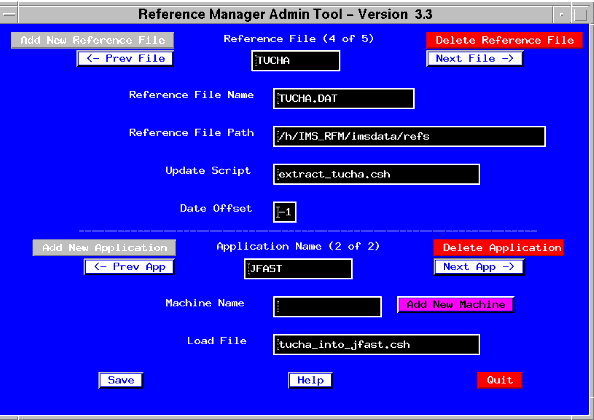
| 1 | From the Session Manager LAUNCH WINDOW, <POINT AND DOUBLE CLICK (left)> on the RFM_ADM icon. | The Reference Manager Admin Tool window (Fig. 3-6) displays. |
 |
| RFM ADMIN TOOL NAVIGATION | ||
|---|---|---|
| 2 | From the RFM Admin Tool window, <POINT AND CLICK (left)> on the Next File button, at the top right, until TUCHA appears in the Reference File panel. | TUCHA appears in the Reference File panel. |
Reference File Path. This is the path leading to the reference file name.
Update Script. This is the name of the script that executes the JOPES database to file process.
Date Offset. This field signifies one of two conditions. If it is -1, it means the file does not contain a DISA date stamp so the date shown with an "*" within the RFM display reflects the date that the reference file was copied from the database to the file. If a positive integer is contained within the Date Offset field, then the RFM display reflects the official release date of that reference file. The offset number indicates the character position of the date in the header so the computer knows where to find it.
| RFM ADMIN TOOL NAVIGATION | ||
|---|---|---|
| 3 | From the RFM Admin Tool window, <POINT AND CLICK (left)> on the Next App button, at the center right, until JFAST appears in the Application Name panel. | JFAST appears in the Application Name panel. |
Note: The Machine Name field is a relic from the days of LOGSAFE operating on clients.
Now that you are familiar with the granting of permissions to the JOPES database and how to use the IMS and RFM Admin Tools, it is time for you to do it on your own.
Requirement. Delete the JOPES database USERID permissions you created earlier, answer the questions concerning the IMS and RFM Admin tools, and exit to the Launch Window.
| PRACTICAL EXERCISE - DELETE PERMISSIONS | ||
|---|---|---|
| Step | Problem | Navigation/Action |
| 3.4 | Delete USERID jd9resxx and all associated functional permissions that you created earlier from JOPES. | |
| 3.5 | Review the User Permission Report to ensure the USERID is deleted. | |
| 3.6 | Return to the Launch Window. | |
| 3.7 | Can a TPFDD in the JOPES database be made available for the DART application? If NO, why not? If YES, will the import be monitored in an xterm window? | Answer: . |
| 3.8 | Is the TUCHA reference file in the JOPES database available to the DART application? If NO, why not? If YES, what date will be displayed in RFM for the TUCHA file? | Answer: . |
| 3.9 | Exit all applications remaining open and return to only the Launch Window. | |